
The world of animation can seem really intimidating – between
AfterEffects, Flash and everything else, there’s so much to learn. And
who has time? Never fear – you can create simple Flash animations
without ever leaving the familiar confines of Illustrator, and without
any knowledge of Flash. Here are two easy ways to get things moving.

Now click the Advanced button to bring up more options. Choose Lossless as the Image Format. Click Looping, so that your animation will play over and over again. The default settings are fine for the rest of the SWF Options dialog box, but you may want to experiment with them in future projects.
The world of animation can seem really intimidating – between AfterEffects, Flash and everything else, there’s so much to learn. And who has time? Never fear – you can create simple Flash animations without ever leaving the familiar confines of Illustrator, and without any knowledge of Flash. Here are two easy ways to get things moving.
Now click the Advanced button to bring up more options. Choose Lossless as the Image Format. Click Looping, so that your animation will play over and over again. The default settings are fine for the rest of the SWF Options dialog box, but you may want to experiment with them in future projects.
Final Image Preview
Below are two final SWF animations we will be working creating. Want access to the full Vector Source files and downloadable copies of every tutorial, including this one? Join Vector Plus for just 9$ a month.Tutorial Details
- Program: Adobe Illustrator CS4
- Difficulty: Intermediate
- Estimated Completion Time: 45 minutes
Video Tutorial
I’ve created this video tutorial to compliment this text + image tutorial.Method I: Blend and Morph
For this type of animation, in which one shape transforms into another (and another and another, if you wish), we’ll use the Blend Tool to make the in-between shapes, then release each shape to its own layer, then export these as a sequence for the Flash file.Step 1
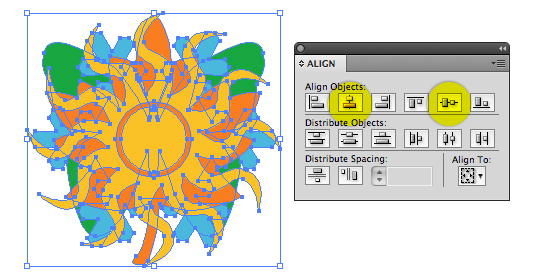
Since this animation will be used on the Web, start with a new RGB document. Here I have four simple icons, representing the four seasons. Select all the shapes, then center-align them horizontally and vertically, using the Align panel (or the Control panel). Make sure that each shape is on the same layer.Step 2
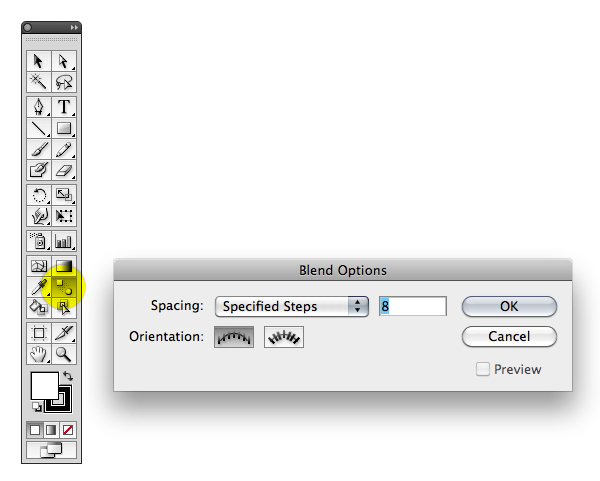
Double-click the Blend Tool in the tool palette to bring up its options. Choose Specified Steps in the Spacing pull-down menu, and type 8. That will give us a smooth transition between the shapes, but won’t make too many layers.Step 3
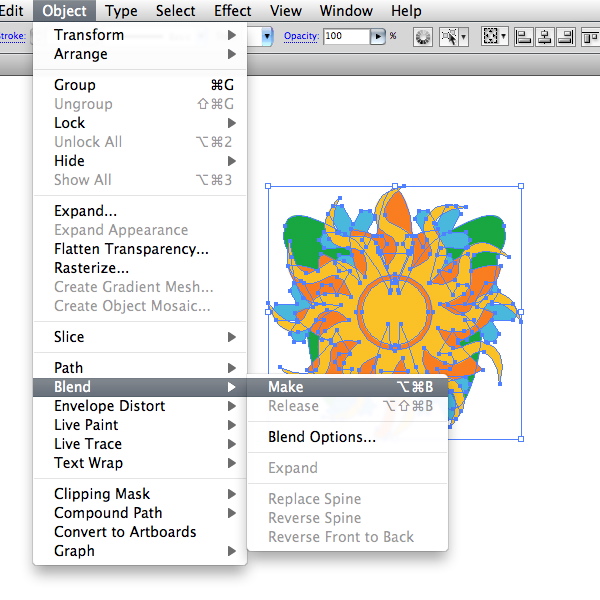
With all the shapes selected, go to Object > Blend > Make.Step 4
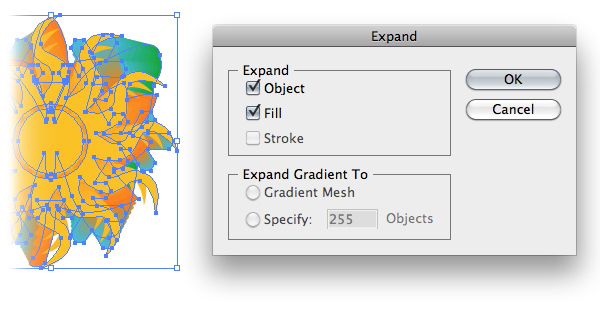
With the blended shapes still selected, go to Object > Expand. This will separate the blend into individual shapes. For this effect to work, the individual shapes must be disassociated from one another, so go to Object > Ungroup.Step 5
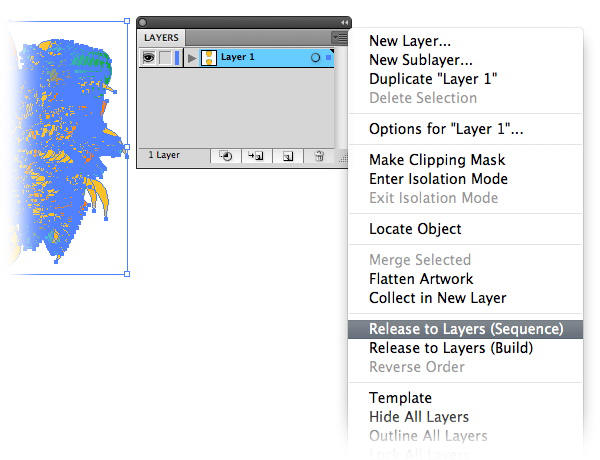
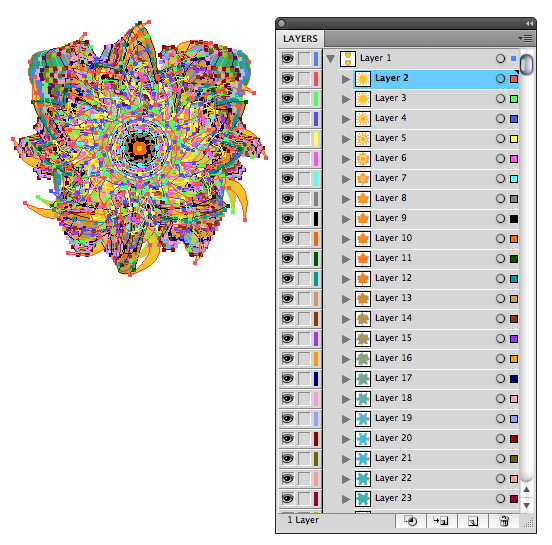
The ungrouped shapes should still be all on one layer. In the Layers panel, make sure the layer is highlighted, click the flyout menu, and choose Release to Layers (Sequence). You’ll notice that each shape is now on its own layer, and each layer has a different color. If you don’t see this, go back and make sure you have ungrouped the expanded blend.Step 6
Go to File > Export and choose Flash (SWF) as the file format (NOTE: Depending on the version of Illustrator and/or the version of Flash you have installed on your computer, the file format might be called Macromedia Flash). Choose AI Layers to SWF Frames as the Export method.Now click the Advanced button to bring up more options. Choose Lossless as the Image Format. Click Looping, so that your animation will play over and over again. The default settings are fine for the rest of the SWF Options dialog box, but you may want to experiment with them in future projects.
Step 7
To see your animation in action, do one of two things: Click the Web Preview button in the SWF Options dialog box, which will launch your default Web browser and play the animation. Or, save the SWF file, then drag it onto a blank browser window to play it.The world of animation can seem really intimidating – between AfterEffects, Flash and everything else, there’s so much to learn. And who has time? Never fear – you can create simple Flash animations without ever leaving the familiar confines of Illustrator, and without any knowledge of Flash. Here are two easy ways to get things moving.
Final Image Preview
Below are two final SWF animations we will be working creating. Want access to the full Vector Source files and downloadable copies of every tutorial, including this one? Join Vector Plus for just 9$ a month.Tutorial Details
- Program: Adobe Illustrator CS4
- Difficulty: Intermediate
- Estimated Completion Time: 45 minutes
Video Tutorial
I’ve created this video tutorial to compliment this text + image tutorial.Method I: Blend and Morph
For this type of animation, in which one shape transforms into another (and another and another, if you wish), we’ll use the Blend Tool to make the in-between shapes, then release each shape to its own layer, then export these as a sequence for the Flash file.Step 1
Since this animation will be used on the Web, start with a new RGB document. Here I have four simple icons, representing the four seasons. Select all the shapes, then center-align them horizontally and vertically, using the Align panel (or the Control panel). Make sure that each shape is on the same layer.Step 2
Double-click the Blend Tool in the tool palette to bring up its options. Choose Specified Steps in the Spacing pull-down menu, and type 8. That will give us a smooth transition between the shapes, but won’t make too many layers.Step 3
With all the shapes selected, go to Object > Blend > Make.Step 4
With the blended shapes still selected, go to Object > Expand. This will separate the blend into individual shapes. For this effect to work, the individual shapes must be disassociated from one another, so go to Object > Ungroup.Step 5
The ungrouped shapes should still be all on one layer. In the Layers panel, make sure the layer is highlighted, click the flyout menu, and choose Release to Layers (Sequence). You’ll notice that each shape is now on its own layer, and each layer has a different color. If you don’t see this, go back and make sure you have ungrouped the expanded blend.Step 6
Go to File > Export and choose Flash (SWF) as the file format (NOTE: Depending on the version of Illustrator and/or the version of Flash you have installed on your computer, the file format might be called Macromedia Flash). Choose AI Layers to SWF Frames as the Export method.Now click the Advanced button to bring up more options. Choose Lossless as the Image Format. Click Looping, so that your animation will play over and over again. The default settings are fine for the rest of the SWF Options dialog box, but you may want to experiment with them in future projects.
Great tutorial. thanks for share this.
ReplyDeleteClipping Creations India
Offshore Clipping Path
Arafin Media
Very useful tutorial. Thanks for sharing with us.
ReplyDeleteclipping path service
You always manage to strike the perfect balance between informative and entertaining.
ReplyDeleteVisit Here: Background Removal Service